How to Create a Configurable Product in Magento 1.9
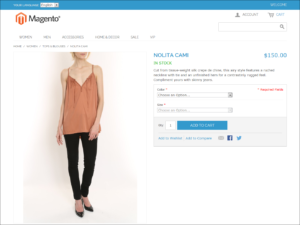
A configurable product looks like a single product with drop-down lists of options for each variation. Each option is actually a separate simple product with a unique SKU, which makes it possible to track inventory for each product variation. You could achieve a similar effect by using a simple product with custom options, but without the ability to track inventory for each variation. Products with multiple options are sometimes referred to as composite product.
Although a configurable product uses more SKUs, and may initially take a little longer to set up, it can save you time in the long run. If you plan to grow your business, the configurable product type might be a better choice for a product with multiple options.
Creating a Configurable Product
The following instructions take you through the process of creating a configurable product with the basic fields. Each required field is marked in the Admin with a red asterisk (*). After you complete the required settings and save the product, you can add images and complete the remaining product information, as needed.
Step 1: Create Attributes for Drop-Down Options
Create an attribute for each drop-down list of options that you want to include in the configurable product. If the attribute already exists and has the correct properties, you can add it to the attribute set in the next step. To learn more, see: Creating Attributes.
Required Attribute Properties
| PROPERTY | SETTING |
| Scope | Global |
| Catalog Input Type for Store Owner | Dropdown |
| Apply to | Configurable Product or All Product Types |
| Use to Create Configurable Product | Yes |
Step 2: Create the Attribute Set
Create an attribute for each drop-down list of options that you want to include in the configurable product. If the attribute already exists and has the correct properties, you can add it to the attribute set in the next step. To learn more, see: Creating Attributes.
Required Attribute Properties
- On the Admin menu, select Catalog > Attributes > Manage Attribute Sets. Then, click the Add New Set button.
- Assign a Name to the attribute set.
- In the Based On list, select an existing attribute set, such as “Default,” to use as a template. Then, click the Save Attribute Set button.
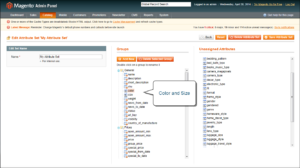
- Starting from the list of Unassigned Attributes, drag and drop each attribute you want to include in the product to the center column. You can arrange them in any order.
- To group the attributes in their own section of the Product Information panel, do the following:
- In the Groups section, click the Add New button.
- When prompted, enter a Name for the new group. Then, click the OK button.
- The new group appears at the bottom of the Groups column.
- Drag and drop each attribute that you created for the drop-down options to group where you want them to appear.
- Click the Save Attribute Set button.
- When prompted to update your cache, click the link in the message and refresh the invalid cache.
Step 3: Create the Configurable Product
| 1. | On the Admin menu, select Catalog > Manage Products. Then, click the Add Product button. |
| 2. | In the Create Product Settings section, do the following: |
| a. | Select the Attribute Set that you created for the product. |
| b. | Set Product Type to “Configurable Product,” and click the Continue button. |

Create Product Settings
| 3. | In the Select Configurable Attributes section, select the checkbox of each attribute that you want to include in the product. Then, click the Continue button. |
| 4. | Complete the Product Information as you would for a simple product, with the exception of the following fields: |
- On the Prices tab, the Price is a required field, but is used as a default price. The price of each individual associated product can be adjusted accordingly.
- On the Inventory tab, Manage Stock is set to “No” by default, because inventory is managed by each associated product.
| 5. | When complete, click the Save and Continue Edit button. |
![]() Step 4: Add the Associated Products
Step 4: Add the Associated Products
| 1. | In the panel on the left, select the last option, Associated Products. |
| 2. | Then, use one of the following methods to add the associated products. |
![]() Method 1: Quick Simple Product Creation
Method 1: Quick Simple Product Creation
This method automatically creates the associated products and optionally, assigns a Name and SKU to each one.
| 1. | In the Quick Simple Product Creation section, the Name and SKU are set to Autogenerate, which makes it easy to see which products belong to the configurable product,. However, if you want to change the default value, you can clear the checkbox and enter a different value. |
| 2. | For each associated product that you want to create, do the following: |
| a. | Enter the Weight. |
| b. | Set Status to “Enabled.” |
| c. | To prevent the associated products from being listed individually in the catalog, set Visibilityto “Not Visible Individually.” |
| 3. | To complete the fields for the drop-down lists, do the following: |
| a. | For each of the configurable attributes that you set up, select the values that apply to the first product. |
| b. | Enter the Qty, and set Stock Availability to “In Stock.” |
| c. | Click the Quick Create button to create the associated product record. |

Quick Simple Product Creation
| 4. | To create additional associated products, do the following: |
| a. | Select the value for each configurable attribute. |
| b. | If there is an extra charge for the selection, enter the adjustment in the Price field. |
| c. | Click the Quick Create button. |
Repeat this step to create as many associated product as you need. As each associated products is created, it appears in the list at the bottom of the page.

List of Associated Products
![]() Method 2: Create Simple Associated Product
Method 2: Create Simple Associated Product
This method opens a blank Product Information form, which you can complete for each associated product.
| 1. | In the Create Simple Associated Product section, click the Create Empty button. A pop-up window with a blank Product Information form appears. |
| 2. | Complete the required fields as you would for any simple product. |
| 3. | Click the Save button to add the associated product. |
![]() Method 3: Copy from Configurable
Method 3: Copy from Configurable
This method opens a Product Information form that contains the values already entered for the configurable product. The only fields that need to be completed are the Name, SKU, and values for each drop-down attribute.
| 1. | In the Create Simple Associated Product section, click the Copy From Configurable button. A pop-up window with the basic Product Information from the configurable product appears. |
| 2. | Complete the following required fields: |
- SKU
- Weight
| 3. | Complete the fields with values for each drop-down list. |
| 4. | Click the Save button to add the associated product to the configurable product record. |
![]() Step 5: Make Any Necessary Price Adjustments
Step 5: Make Any Necessary Price Adjustments
Use the Super Products Attributes Configuration section to make price adjustments to a specific associated product. The adjustment can be entered as a fixed value or percentage, and is made in relation to the price of the configurable product.

Super Products Attributes Configuration
![]() Step 6: Configure the Shopping Cart Thumbnails
Step 6: Configure the Shopping Cart Thumbnails
| 1. | On the Admin menu, select System > Configuration. Then in the panel on the left, under Sales, select Checkout. |
| 2. | Click to expand the Shopping Cart section. Then, set Configurable Product Image to one of the following: |
- Product Thumbnail Itself
- Parent Product Thumbnail

Shopping Cart
| 3. | Click the Save Config button to save the setting. |


